Friday, January 29, 2010

Ingrid Cardigan lives!

On the coldest day so far, I finally finished my cardigan, which is great, as it is 19 degrees here today! My son obliged me in taking some photos. On the whole I am pleased with how it came out, as I gave in to the zipper fetish I seem to have. There is just something so cozy and symmetrical about zippers. Maybe it is the nice hug feeling, or the fact that, despite shaping and such, I always feel buttons will gape and open unattractively. Anyway, I have nearly finished writing up the pattern, except for the size modifications, and then it will be ready for prime time.
Now I'll have to finish my blue cardigan, and then contemplate my next project...
Here it is with collar up...and then, back view:
And finally side:

Tuesday, January 12, 2010

Ingrid Cardigan, part 2

So, the most challenging part of working a top down set in sleeve cardigan is, of course, incorporating all of the cables and shaping as you are knitting it. I find I must have an image in my mind of what I want it to look like when finished, and work towards that. It is naturally easier to knit from the bottom up, as you have all of the main cables established, and the shaping for armholes and sleeves and such occurs by decreasing mainly, so you don't have as much to keep track of. Of the other hand, you don't get the fun of watching things emerge from nowhere either, so there is that. Also the piece can be tried on as you go, so adjustments for length and proportion can be done on the fly.

So, here I was last night, having divided for sleeves and knitting merrily along. I am liking how it is coming out, but decided I needed to add a rope cable at the armhole edge of the fronts and backs. This meant doing a bit of surgery, by unknitting the 6 sts at the edges of the armholes and reknitting them as 4 knits of cable and 2 purls. Doing this 4 times took a couple of hours, but I was very pleased with how that came out. Writing that into the pattern ensued. Now the pattern is probably complete, and most of the details worked out except for sizing. I'm going to wait on that until I finish knitting this one, in case of surprises.
Here is another view of the front:


And here are two more views after a bunch of more knitting:


And the front:


I'm really liking how this is coming out, fortunately!
.

Friday, January 08, 2010

Ingrid Sweater,part 1

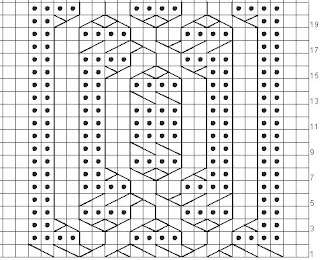
So, here is the cable I started with for the collar of my new sweater. I hope the chart and directions make sense!

This is the front( RS) of the cable.

This is the back, or WS. But it might as well be the front side!
In designing this cable, I decided to have all of the crossing action occur on the RS. This makes for a lot of cabling in one row, but ultimately easier to keep track of, since the WS knitting is all "K the Ks and P the Ps" as they appear.
Here is the chart:


And here is the key:


P4F: Move 2 purl sts to cable needle( CN), hold in front, p2, p2 from CN
P4B: Move 2 purls to CN, hold in back, p2 ,p2 from CN
C4F: Move 2 knits to CN, hold in front, work next 2 sts as they appear, k2 from CN
C4B:Move 2 knits to CN, hold in back, work 2 sts as they appear,k2 from CN

And here is the cable pattern in words:
Cable A: on 24 sts


Row 1: (RS) K2,P4F,C4B,P4F,C4B,P4F,K2
Row 2: (WS) P2,K4,p4,k4,p4,k4,p2
Row 3: k2,p2,C4b,c4f,c4b,c4f,p2,k2
Row 4: p2,k2,p2,k4,p4,k4,p2,k2
Row 5:K2,p2,k2,p4b,c4f,p4b,k2,p1,k2
Row 6:P2,k2,p2,k4,p4,k4,p2,k2,p2
Row 7:k2,p2,k2,p2,c4f,c4b,p2,k2,p2,k2
Row 8: p2, k2,p2,k2,p2,k4,p2,k2,p2,k2,p2
Row 9: (k2p2) twice,k2,p4f,(k2,p2) twice,k2
Row 10: (p2,k2( twice,p2, k4, (p2,k2) twice, p2
Row 11: (k2,p2) three times,(p2,k2) three times
Row 12: same as row 10
Row 13: same as row 9
Row 14: same as row 8
Row 15: (k2,p2) twice,C4F, C4B,(p2,k2) twice
Row 16: same as row 4
Row 17: k2,p2,k2,P4B,C4F,P4B,k2,p2,k2
Row 18: same as row 4
Row 19:k2,p2,C4F,C4B,C4F, C4B,p2,k2
Row 20 same as row 2

I find the chart much easier to knit from, as it is a graphic representation.
So, here is the beginning of the sweater, with the collar and the two fronts attached.I'm using two different cable patterns, but the second one is not reversible. Now, back to knitting!


And here is progress up to Row 11 of the yoke:


Meanwhile, I'm still working on my other cabled sweater, having divided for sleeves and now knitting the body:


And here is my friend Linda trying it on from the back:


Friday, January 01, 2010

Design and Conquer

For the last few winters, I have found myself captivated, obsessed, enthralled and overwhelmed. Not by all the usual holiday whirlwind of presents, food and family, but (perhaps as an escape?) posessed with the glimmer of an idea. I can see it, in my mind's eye, shimmering just around the corner, whispering to me, teasing me with its seductive beauty and alluring charms : here is A new sweater that I must make. Now this is not a picture in a magazine, or maybe it starts that way, or maybe an offhand comment by a friend, or, in this case, a series of emails from a reader of my blog, in a far away place, suggesting, ever so nicely, that I consider making a particular sweater in a new way. Being an aficionado of top down all in one piece sweaters, I have studied this method for the last several years, applying it to many forms and shapes of garments,. I love watching my idea take shape, so gradually, slowly, as the knitting progresses over time. I make swatches, predictions, decisions, charts and drawings, but it is only over slow time that I can see if my idea will work. Writing down what I do as I go along is tedious, annoying, subject to errors of omission, as I change my mind, rip out, backtrack, revise and ultimately jeririgg the whole thing together. I am rarely satisfied when the thing is done; seeing the miscalculations and flaws, and dreaming already of the next adventure. For these knitting inventions are like an adventure for me. An excursion to the land of possibility, a ride through perilous thickets of uncertainty, a jaunt through possibilities in which I have only myself to please, and only myself to blame. Writing the result up as a pattern, either while it happens or after the fact, becomes work, becomes like trapping a butterfly under glass and fixes the form forever more, rather than documenting a dynamic process as it unfolds. Maybe the form should be a film, but perhaps this would be as interesting as watching paint dry. Certainly my share of films is watched during the knitting/designing of a sweater, and the world and family events swirl onward as the days and weeks flow by until the sweater emerges, full in form, a miracle of loops.


In any case, this winter’s project crept up on me, spurred by a reader who innocently wondered if a collar could be started in the center back of the neck instead of on the front side edge, as I have done with my raglans. This idea, combined with the recent flurry of reversible cable scarves I made, got me wondering if a shawl collar would be cool if done in a reversible cable, so it could be turned up or down and still look good. And I loved making my Diamond Cardigan last winter, but wanted another one with a different neckline, so I had already the bones of a new sweater.

So I started swatching. And graphing (on graph paper, with a pencil and eraser handy).


And more swatching, realizing I had no yarn in the house that fit the requirements of gauge (4 stitches per inch on a size 9 needle) and color (a lighter color so I could photograph it). A trip to the yarn store ensued, and a bunch of Cuzco by Berocco came home with me. Although it was a natural color, quite unusual for me, the yarn is lovely, soft and gorgeous, so it will be a pleasure both in the knitting and the wearing. And maybe overdyeing will happen, or not.

Of course, this precipitated more swatching..


I started with the first cable I designed, which delighted me, and was based upon the arm cables from the Celtic Braid Cardigan that I made last month. This cable pattern, if you cross when you have a group of 4 purl stitches as well as when you have 4 knit stitches, becomes reversible, or pleasing from both sides. It is not the identical cable pattern on both sides, but it is pretty. I found it acceptable, and began to knit it. The thing about designing with cable patterns is, you must swatch each variation of each cable pattern, because predictions don’t really work. If you design in stockinette, for example, you can pretty much figure that when you increase by “X” number of stitches, you will get “Y” number of inches. Not so with cable patterns, as the ribs and the crosses pull in the fabric quite a bit. The more crosses you have, the more it pulls in, and therefore it is not a simple matter to add cables to a stockinette based design, unless you swatch each cable in the yarn you are using. However, recently several designers have published cable sweaters where they accomplished the sizing and the various shaping required by adding stitches in columns or wedges of stockinette (or reverse stockinette) or in seed stitch. This becomes a lovely way of working more predictably. But still, knitting stretches and yarn will have different characteristics of stretch and elasticity, depending on the fiber. And in aggregate, stitches will stretch unpredictably, so you sometimes don't know if the whole thing will actually work until you knit a good portion of it. In this case, the cable I had was a bit too short for the back of the neck, as I wanted the repeats to come out evenly, so I had to rewrite the cable and make a new chart for it. The Diamond cable I was using for the body of the sweater also was too long, so I decided to compress this one to give same number of rows for both cables.That way I could simply tell at a glance which row I was on in both cable patterns.


When I design for myself, I can play with it, knowing I have only to please myself. If I design a pattern for someone else, I have to worry about which yarn is used and how it will work in the knitter’s hands.

So, caveat emptor!

Meanwhile, I realized that if I was going to share this design, I’d have to have charts in a format that I could share. In the past, I just made my graphs on graph paper, and photographed them. I thought this time I should use a computer program. I have a knitting font in Excel, so I started with that. Too tedious for me. I did a search on the ‘net, and found Jacquie’s amazing Knitting Chart Maker here:

http://jacquie.typepad.com/Charts/knitChart.htm  This is a fantastic tool! I had a great time playing with it, and with the help of my husband, and Photoshop, was able to get some charts made.

The only thing is that there was no clear symbol for a cable where you hold 2 purl stitches on the cable needle, purl 2, then purl 2 from cable needle, so this has to be up to the reader to follow the key and think about how the knitting actually will go. But I think it works well.

I spent the entire day yesterday working with the charts, so didn’t get much actual knitting done on the sweater! But I think it is coming along the way I envision.
So, back to knitting and swatching...
Happy New Year! Let's hope 2010 brings good things to all and some relief from the stressors which 2009 had in abundance..