Tuesday, December 06, 2005


My blue heaven...in the quest for the perfect blue I have dyed these beauties....

Dyeing continues to thrill me. Here is a run of purple and green shading to turquoise. Melanie ( http://www.melanietesta.com/mtype/ )and I discussed using LWI versus direct dyeing, but I still enjoy the immediacy of direct dyeing. Maybe LWI is in my future!

Saturday, December 03, 2005


My latest batch of scarves is here being guarded by my kitten Sha, placed here for relative scale. He's about six months old, and of the same relative softness as the velvet on the scarves. Too much fun! Now I have to figure out which ones I want to keep and which ones I want to sell or give away as gifts. Decisions decisions. If you want one sent me an e-mail, jeri.riggs@verizon.net.I'm selling them for $30, including postage, in the continental US. And now back to my current knitting project which of course revolves around knitting up a vest in white rayon chenille and then dying that. I've been having so much fun with dying all of the scarves, I now have some more ideas about color combinations. I just wish I could knit faster! More on that later.

Friday, December 02, 2005


Colors used included evergreen, chartreuse, intense blue, mixing red, golden yellow, and deep purple. Not all at once of course! That would probably give me a very rich and deep mud. Which might not be such a bad idea for next time! I can see how this would become like p�t� chips you can't eat just one..

Here are some of my most recent scarf extravaganzas... the colors are even more intense in the sunlight because the rayon reflects the light so richly.

Velvet Scarf Obsession

After being gifted with a beautiful silk and velvet scarf by Deb Lacativa, (http://morewgalo.blogspot.com )I got to thinking how much fun it would be try my own hands at dyeing some scarves. Here is a picture of my first batch. Oh my goodness it was so exciting to play with all the colors!! and see what comes out. I had to do some research to find out where to get a source for different scarves and figure out how much dye powder to put in, and develop a procedure for actually doing the dyeing and hanging them up to dry. Deb was immensely helpful to me in answering some of my questions, and generously sharing her process. The results were so exciting I can't wait to go do some more. Now I know what everybody on my gift list is getting for the holidays, if I can bear to part with any of them!.

Thursday, September 22, 2005


Diagonal Sweater Number 2 is on me, and I'm standing among 3 of my recent quilts at the opening of The Salon Seven show, May 2005.

Here is a shot of the starting triangle, which is at center back. The markers show you where the "spines" are--which indicate the increase points. I have not begun to add the fronts yet.

Here I've laid the thing out on the floor with labels so you can see the progress of it.The loose yarn is at the center back starting point.

Here I've knitted a bunch and tried it on. You can see how the point in the back grows...

Here is the point where you have divided for sleeves ( leaving them on holders) and continue working on the body of the sweater.

Here is a view of the nearly finished Diagonal sweater.The Left sleeve isn't completed yet. I kept the sides diagonal instead of finishing off the triangles, and it is fun to wear!

Saturday, July 23, 2005


Let's say we"re sewing together three diamond shaped patches, yellow blue and purple.
The first thing I like to do is put a small dot with a pencil or water-soluble pen , at the point on the diamond where two quarter-inch seams meet. This is the place where I will only sew up to but not beyond it into the seam allowance. Because the seam allowance is going to be free it allows me to move the seams in whichever direction will give the flattest seam when I get ready to press, and also lets the pivot the seams when I am sewing.

Blue is underneath yellow; sewn together

First I sew the yellow diamond to the blue diamond from the marked point to the other end of the seam, with the yellow diamonds on top . When you are sewing diamonds together you actually can sew into the seam allowance on the very pointy end of the diamond, because generally this particular join creates kind of an "outie" point, and doesn't require the same folding as an "innie" join. Press open the two diamonds with the bulk on the seam going towards the blue diamond. See photo

Now place the purple diamond underneath the yellow diamond, and sew them together from the pointy tip up to your marked dot, with a quarter-inch seam. I generally back stitch at this point, and then take my needle out of the sewing. See photo

Next, you want to fold the the yellow diamond out of the way so that the purple diamond lines up with the blue diamond, and beginning at the dot, where now the yellow diamond and the blue diamond meet the purple diamond, sew the blue diamond to the purple diamond. See photo
,

1. Now if you press the seams in a counterclockwise direction, and the blue seam ies on top of the purple diamond, the purple diamond lies on top of the yellow diamond and the yellow diamond lies on top of the blue diamond, you will see at the center a cute little whorl appears where the free seam edges can line up. See photo number five.
Well, I've tried to explain sewing Y-Seams on this blog, but it is really difficult to keep the sequence organized, my being a blithering novice and trying to talk on the phone while blogging! That will teach me to concentrate! Next lifetime...Meanwhile, you can see the photos, and maybe it will help! Or maybe not. Anyway, thanks for looking! LOL...

Sewing Y-seams isn't so hard!!

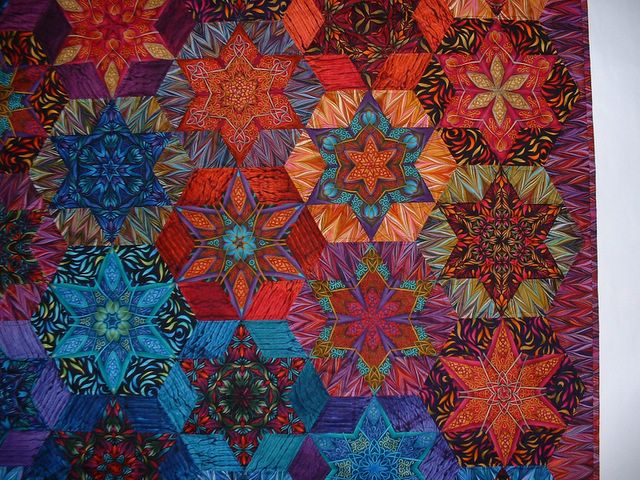
Many people have asked me for an explanation of how to sew inset seams or Y-seams after reading my Luminosity Stars pattern in the Fons and Porter March 2005 issue.
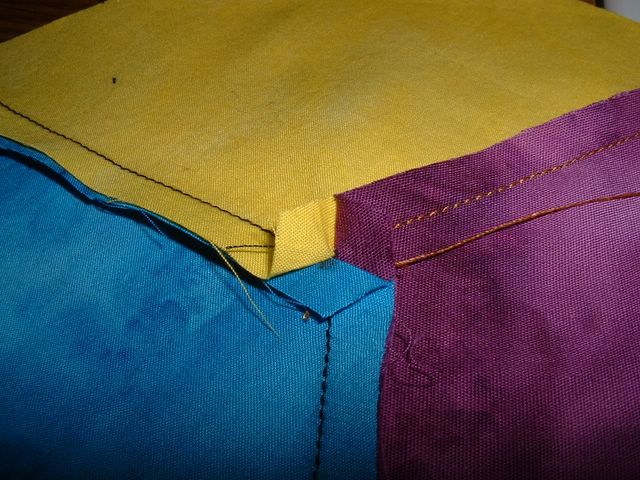
Basically an inset seam develops at the intersection of three seams meeting at a single point, such as in the pattern Tumbling Blocks, where three diamonds meet at a single point, or when you sew together rows of hexagons. My Luminosity Stars pattern involves both of these configurations, and lots of Y- seams so it will give you a great deal of practice in learning how to do this! You will be an expert after you make this quilt.
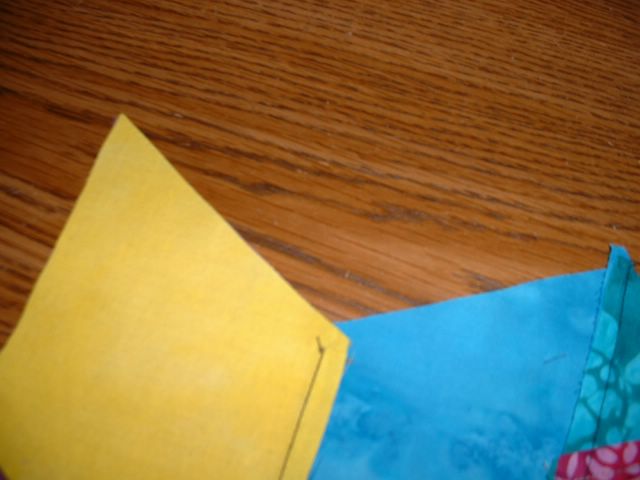
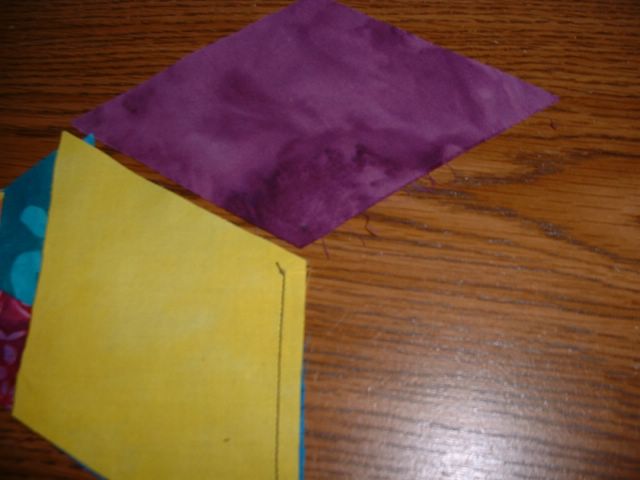
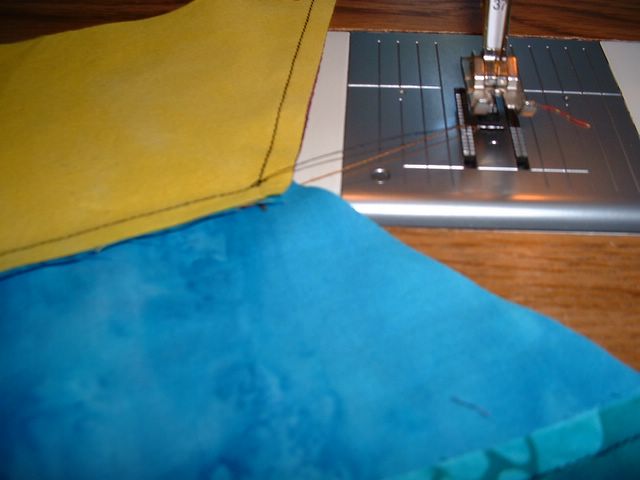
Once you get the hang of it this is actually a very easy maneuver to execute, but it takes a little bit of precision and some advance planning. First of all you need to be able to sew an accurate quarter inch seam. Either you use a sewing machine foot designed especially for quarter-inch seams, or measure from your machine needle to a quarter inch away and mark your sewing machine with a piece of tape.

1. Next, you want to fold the the yellow diamond out of the way so that the purple diamond lines up with the blue diamond, and beginning at the dot, where now the yellow diamond and the blue diamond meet the purple diamond, sew the blue diamond to the purple diamond. See photo number four

1. Now if you press the seams in a counterclockwise direction, and the blue seam ies on top of the purple diamond, the purple diamond lies on top of the yellow diamond and the yellow diamond lies on top of the blue diamond, you will see at the center a cute little whorl appears where the free seam edges can line up. See photo number five.

You don't necessarily have to press the seams this way but I think it looks cool. On the next photo you can see two different ways of pressing the seams, and they both work but one has a little more bulk then the other one. Sometimes I might want to press them all one direction to prevent shadowing where a light color is going to show dark colors behind it. It's your choice.
The same kind of procedure applies for sewing together the hexagons in this case you again only sew up to that quarter-inch.and that allows you to move the seams this way and that so they line up properly. Good luck and I hope this helps.

Tuesday, April 12, 2005


This is my rayon chenille sweater. It is knit with two strands of rayon chenille held together, because it was very thin stuff. The bottom has two repeats of a lace design which was my first attempt at lace. I learned a lot about using markers liberally, after I had to rip it out a couple of times when I was interrupted in my counting. Thank goodness for plain knit rows in between!! Once I got the hang of it,it was a lot of fun. I'm planning to dye this one of my many favorite shades of blue.

After dying, my rayon sweater is very comfortable to wear and just the right shade of blue. I'm very pleased with it. It's time to make another one!!

Here is the beginning of my diagonal sweater. It's made from Sheaffer yarns,"Elaine" in the colorway Spanky, with a little bit of left over Mr. funny. I'm kind of playing around with the design geometry and having a lot of fun with it.

Here is my nearly finished diagonal sweater. I got inspired when I saw one made by Jan Poll on the Internet, and wanted to make my own. By the time I received her pattern in the mail, I was merrily along and nearly finished with my version of the sweater. Amazingly we had used entirely different techniques for creating a very similar shape. Because I don't enjoy sewing up pieces, my sweater is created in one piece from the top down. I'm still debating whether to add a zipper to the front, or a button band and buttons. I think it may also need some cuffs. Ah, the fun of designing!!

Sunday, March 13, 2005


This fabric strip knitted purse is lined with the fabric I used to make the strips.

These are the backs of the purses showing how the yarn part goes down the back and serves as the flap.The front of the purse is fabric, and the handles are basically I-cord.

Here are my fabric strip/novelty yarn purses. I had fun making two of them, from fabric I had that seemed to coordinate with yarn in my stash. I cut the fabric( about a yard or less) into 1/2 inch wide bias strips with my rotary cutter, and sewed the ends of them together on my machine to make smooth joins. I had funknitting them up and found the combo to be interesting. Of course I got bored after 2 of these, and was disappointed to find kits of precut strips in the local discount store. So much for original ideas! LOL...

Tuesday, March 08, 2005


I finally finished my first real sweater!! I've made some vests, but when I found the Incredible, Custom-fit Raglan Sweater by Pamela Costello at http://www.woolworks.org/patterns/raglan.html I loved the whole concept and just had to try it. It is knit top down , on circular needles with no seams! So,you can try it on as you go! In the middle of making it on my Addi Turbos I acquired a set of Denise needles, and I just adored how I could snap together sections of cord to try on the sweater as it was being made, without having to slide the whole thing onto yarn and then back onto needles. That made the entire process a complete pleasure.The pattern is brilliant, and allows for complete customization, suiting my style of making stuff up as I go along. The yarn was Schaefer Yarns Elaine, 99% Merino wool and 1% nylon, and miracle of miracles ( to me!) it is not itchy! In fact, this is the first wool sweater I've ever owned, being phobic about wool since infancy. My mom tells the story of me screaming and flailing about as an infant in a new wool garment--and I refused ever towear it again. Now, at 49 years old, I have discovered the pleasure of Merino wool. And I'm hopelessly addicted...

This sleeve thrilled me with the pattern that unfolded as I knit it in the round. I just loved the zig zag of it. As I decreased to taper the sleeve, the pattern naturally fragmented out of the coherence of that section, and reverted to the quasi random patterning of the rest of the sweater. I love how the other sleeve has a similar but not identical section in the same place.

Here is a better photo of my moebious scarf. I actually made this last year, and it is knit of Berroco Chinchilla Bulky, in the natural color, then dye painted with procion dyes. I knit it the short way and joined the ends with a twist .It is soft and silky and wonderful to wear.

As you can see, my cat loves my knitting! Here she is comfortably getting cat hair all over my rayon chenille vest. Wonder why she doesn't like the scarf next to it?

Saturday, March 05, 2005


This is a Torah cover I created in 4 hours the day before my son's Bar Mitzvah in May, 2003. It measures 26" X32", and is designed to tie around the Torah, and to serve as a temporary cover only.

This is a detail of the center. It is paper-pieced in sections. I drew the design on freezer paper with a ruler, and used it for my pattern and templates.

Here is the quilting on the back--simple and quick. Using puffy polyester batting made it easy.

Here is the detail of the quilting on the back, showing also the attached ties.

Friday, February 25, 2005


Here I am in the final result: a very warm and comfy vest. With only one pocket.

Here is a closeup: I meant COLORS!!

Here is my lovely dyed Rayon Chenille: Colors are great, but dreadlocks resulted! It took 8 hours to untangle this skein--and I had 3 of them! Luckily family helped.

Here is my most recently completed quilt " Kitty in the Sky in Sapphire", for the Northern Star Quilters Guild Challenge. (www.northernstarquilters.com ).The quilt won a cool ribbon 3rd place for Whimsy. The whole Challenge exhibit ( 31 quilts!) will go to Lancaster QHC www.qhconline.com in April, and then to the NSQG show April 30, May 1st 2005

Climbing aboard the bandwidth

Well, I decided to jump into the fray. It might be a side effect of the cortisone in my neck facet joints, or perhaps frustration at how slowly my webmaster( who is a very busy but delightful guy) gets around to updating my website ( www.jeririggs.com), but I wanted to post NOW. Photos. Hope I can figure out how to do this before my typing limit is reached. My repetitive strain disorder has kicked in, so I must sneak my movements under the fleshy radar for a few weeks.
Anyway, Hi!