Sunday, December 21, 2008

Winter Obsession


Alice Starmore's knitting oevre is legendary among knitters. She has a site now called http://www.virtualyarns.com/ with lovely photos of her designs where you can purchase kits for the yarn. Sadly, many of her books remain out of print, but now and again they can be found on Ebay or, amazingly enough, in local libraries!
When I started this knitting odyssey, I was attracted to very complex designs, with lovely intricate colorwork and/or cables , but soon realized they were way beyond my skill level. I had a while to go in terms of learning before I could tackle anything that complicated. There is also the time factor: dancing between desiring instant gratification and long term projects , as well as the need to master as many things as possible, I gravitated towards lace, which gives the satisfaction of complexity with the speed of human timeframes on larger needles. For some situations, my RSD strikes and I have to back off, so that factors into my choice of projects . Also, I like to make garments that I can wear, so there is the intellectual challenge of knitting to create a 3 dimensional object and making something that fits me.
I have long adored Ms. Starmore's
an intricate cabled sweater, but because the smallest size is 43 inches across the chest, and has dropped sleeves, I knew I could not wear something this big, and it would not flatter me.
Zooming around Ravelry, ( www.ravelry.com ) I came across several folks who had modified the design to fit them, and I had the idea that I could try to knit something for myself.
I finally knew enough to have an idea how I could manage this! And I had several stashed yarns that might be fun to knit this with. And finally, I had a dear friend who had the book Aran Knitting, so I was able to borrow it on Dec 10th and obtain the pattern, which is charted out. So, it all came together into my winter obsession.
Now, what is the first thing one does when starting a new knitting project? Swatching! My first swatch, in Zara on a size 4 needle, didn't make me happy somehow. I swatched again with Nashua Handknits Creative Focus Superwash, a merino wool blend that has a rustic feel, but is actually nice to knit with. And it shows the cables nicely, and I had 10 skeins ( at 218 yds each) so I had plenty of yarn! And of course, it is in electric blue.
My swatch of this yielded 22 sts per inch on a 6 in double moss, which is pretty close to the pattern gauge, so I cast on and knit a repeat in the round of the whole sweater, subtracting 12 sts on each side, hoping it would come out to something more like 40 inches.I needed to make a set of stitch markers with letters on them so I could keep my place in the charts.
As is the nature of swatches, they lie! LOL! My swatch measures 46 inches!


But I now have a nice piece of fabric to measure and gauge how to redesign the pattern so it will hopefully fit me.

And it's back to the drawing board for thinking about this some more...

Thursday, December 18, 2008

In search of blue

At least a year ago a friend sold me some Lorna's Laces Worsted in the colorway "Stormy". I thought it was lovely yarn, but of course, the black and white was a bit too graphic for my taste. I thought it would look lovely overdyed with blue, but never got around to it...On the 9th, I had my going away party at the shop I have worked for for the last nearly 2 years, and chose a lovely skein of Gread Adirondack silk yarn in a cream, beige and white colorway. Everyone looked at me like I was kidding when my eyes lit up and I said I loved the yarn!. I could see the possibilities....So I made up some dye ( Brilliant blue, a warm blue) and finally had a chance to dye both the silk and the Lorna's....the photos don't do it justice, but all of the yarn is gorgeous! Now it has to marinate in the stash for a bit until it tells me what to make.
Before dyeing After dyeing

Vested Interests


I'm lucky I invested in yarn this year. With the current economic climate, it is reassuring to have boxes and bags full of potential projects waiting for me. So I decided to make a vest. I began this November 24th, at a knitting guild meeting, and enjoyed knitting it during Thanksgiving, finally finishing it December 9th. I used 6 skeins of Blue Sky Worsted hand dyed alpaca/Merino on a size 9 needle, and as it was top down, I could play with shape and sizing as I went along. I intended to make it long sleeved and a bit longer, but to tell the truth, the weight of it began to hurt my neck, so I called it a vest and finished it off as a short sleeved top. I enjoy wearing it, though, as it is warm and comfy, but not too warm. Here is my friend Debby modeling it, and you can barely make out the cables because it is black!

Friday, December 12, 2008

The Joy of Sox

Just look at these beautiful, perfect, wonderful and lovely socks! They were knitted for me by my dear friend Elizabeth Rosenberg ( www.elizabethrosenberg.blogspot.com ), and they are the most amazing shade of electric blue Fleece Artist merino. I'm loving the pattern, the way they fit, the warmth of them. What a fabulous gift! Thank you, Elizabeth! Wow! Now I'll have to make a sweater to go with them...I must have some blue yarn around here...


Tuesday, December 02, 2008

Get enough blue?

I had to knit another Wisteria. What a great pattern! I loved knitting this the first time, but wanted to use a DK yarn now instead of the worsted weight called for, so I did some math and found that the 40 inch size numbers worked out to the 36 1/2inches I needed. I cast on with some scrumptious blue Koigu Kersti, and merrily knit away. Added bust darts, shortened the length and sleeves by 2 inches and had a great time. A wonderful pattern!
Size 7 needles, approximately 8 1/2 skeins later, and I am happy!
For the moment...now to knit something completely different....

Sunday, November 23, 2008

Scarf Riot


And now, just in time for Holidaze, I present two scarves. Both are one-skein salvations...


Scarf One: Loop Scarf:


You make the loop first, and then knit until you run out of yarn.:100 yards worsted weight yarn, size 8 needles ( approx gauge 4.5 /inch for a 6 inch wide scarf) Cast on 14 stitches. Knit until strip is 8 inches long. Curve the strip around until you can stick the tip of the RH needle into the corner edge of the cast on , and pick up 14 stitches along the cast on edge, making now 28 sts on needle.Knit until you almost run out of yarn ( leave about a yard remaining) and then bind off.This one I actually made in Misti Alpaca Chunky, and used 10 stitches for the loop and 20 for the body, and Double Moss Stitch, but the principle is the same. You can also slip the last stitch of each row and knit the first stitch for a nicer edge.


Scarf Two: Sparkly Triangle Scarf.


Uses one Skein of Artyarns Ensemble with Beads and Sequins, ( 128 yards) size 11 needle.


Cast on 3 sts;
Row 1: Kfb,knit to last stitch,kfb. Repeat row until almost out of yarn ( about 4-6 yards left).
Stretchy Bindoff: K2,* knit these 2 together thru back loop( insert tip of LH needle into front of the two sts as if doing SSK). Knit one. Repeat from *to end. Weave in ends. Enjoy!


Wednesday, October 22, 2008

Achieving Bliss


Lately I've been asking myself, why knit? I have lots of clothes, admittedly none of them are exactly right for every occasion, some I never wear but they lie in wait for the perfect opportunity ( a combination of temperature, venue, slenderness and time of day), some were great for a specific occasion and some are favorites that I reach for over and over but are wearing out. I suppose I'm always dreaming of some piece of clothing that will be just right, but never found. I knit for the challenge of it, or to realize an idea that just might work. Sometimes the yarn is so beautiful it begs to be knit into some article that will show its beauty to best advantage,sometimes this goal is achieved, and sometimes not. This sweater began as a bag of 10 skeins of Debbie Bliss Merino Aran, a discontinued yarn in a perfect shade of teal blue, bought at Webs in the back room. It sat in bags for a while, was swatched, but never seemed to materialize. Finally I thought I'd try a top down cable and rib sweater, as I only had 10 balls. I knitted the whole thing, only to find I'd miscalculated and it was too tight. I scoured Ebay and Ravelry, only to buy 2 balls of same color number but different dye lot which were noticably different in color. I ripped out some , reknit, and found it was too short. Finally I though I'd sacrifice the sleeves and rip some more, reknitting from the waist down and having a short sleeved cowl necked vest/sweater. I love the result, and finally achieved some measure of Bliss..

Sunday, October 05, 2008

Wonderful Wisteria

A new online knitting magazine, Twist Collective ( www.twistcollective.com ) recently had a fabulous sweater by Kate Gilbert on it, and I had to knit it immediately. I loved this pattern at first sight, and couldn’t wait to cast on, so I used some hand dyed yarn I had purchased last year at Rhinebeck, but didn’t know what kind of yarn it was, as a small vendor had it for sale and I bought 5 skeins because I liked the color. Swatching yielded gauge, so I went with it. It was a bit unevenly dyed, so the total effect is uneven, but I loved making this sweater and watching the cables merge and emerge. I think it came out a bit long for me, and I shortened the arms by about 4 inches, but I loved the total effect. I might have to make another one in a plain yarn so the cables pop more.. Thanks to Kate Gilbert for a wonderful design!
Here I'm wearing it in the shop where I work, Sticks and Strings ( www.sticksandstringsknitting.com ) where I admire the Koigu and wish I could have every color....

Thursday, August 28, 2008

Side to Side Cardigan II

Continuing on my quest to design an easy and fun sweater using odd balls of yarn, (purchased on yarn buying binges, furtive sales,random search and buy operations), here is the next in the series. Designing sweaters is kind of like making art in a series, where one idea leads into another, and all the tricks and tools I've gleaned are used to fabricate something interesting.
This sweater follows my earlier Ariel sweater, and is constructed basically the same way: knit in the round from the wrist up to the underarm, then stitches are cast on for the body and knit flat in one piece back and forth to the base of the neck, then stitches are divided for front and back. Then the back is knit to the center where both halves are joined with a 3 needle bind-off. Then the front is knit, stitches picked up at back neck, and knit down the other front to create the fronts and the shawl collar. I cord is used to bind off the fronts and collar. I've found an easy double sided cast-on for the side "seams" which delighted me, as there is no visible seam, in fact!
Here I've used Rowan Summer Tweed, 6 skeins of the grey and 2 of navy blue, with a skein of hand dyed sari silk to give a contrast and some color punch. As usual, this sweater is customizable to any yarn and any size, in theory, working from gauge of yarn and body measurements. I actually wrote up the pattern for my friend Linda, who is here modeling the sweater ( before darning in ends and blocking!):. She looks fabulous in it. If you want the pattern, email me! I think I might attempt it in Koigu Kersti next...

Thursday, August 14, 2008

Side to Side Sweater

Ah, summer. Hot and sticky. But sometimes I want to wear a sweater, and so far everything seems too hot. I thought it might be interesting to knit with Ariel, a dk cotton/rayon blend, but on larger needles and produce a light, airy sweater, so I cast on 27 sts with size 10 1/2 double pointed needles, and proceeded to knit a sleeve. I liked how the fabric was coming out, so I increased 2 sts every inch or so until I reached 47 sts at the armpit, then cast on another 47 stitches to knit the sides. By casting on both sides of the needle, I could knit up the side, around the arm and down the front. I knit about 6 inches, then divided for the back neck, and did some decreasing to make a V neck in front. When I had half a body, I cast on for the other sleeve, and likewise knit merrily along. Finally, I did a 3 needle SSK bind off ( to preserve the stretchiness) and then arrived at the top back neck. I crocheted scallops of 5dc around the fronts and bottom edge, arriving at the back neck. At this point I thought it might be nice to close with 2 crocheted double bobbles, so that is what I did. A very light, airy sweater, perfect for summertime. I used around 580 yards, or most of 4 balls.( 160 each). Here is another photo taken by my artistic son Bobby:

Wednesday, August 06, 2008

Some Summer sweaters

Here is my most recent experiment in knitting: The Medallion Lace vest. I used size 8 needles, Provence cotton yarn, and adapted a shawl pattern from Evelyn Clark's wonderful book "Knitted Lace Triangles" for the pattern. The border is two offset repeats of the same pattern I used in the Leaf Lace vest from a few months ago. I initially thought this would be a cardigan, but when it was done, I thought it might be fun to sew up the center seam and make it a pullover. Probably I should have made it a pullover to begin with, but sometimes these experiments take on a life of their own! Here is the back view:
I also made this cardigan ( knitted top down, adapted from the CeCe cardigan by Chic Knits) ,in Provence cotton yarn, which I call the Torchwood Cardigan, as I watched the first 2 seasons of Torchwood while knitting it:
I probably should do a better job of weaving in the ends...but I'm lazy!

Wednesday, June 04, 2008

Diagonal Triangle Tank

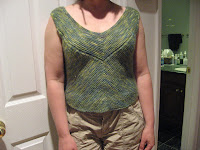
Ever handy with a spatula or knitting needles, here I am wearing my latest creation while cooking dinner. This is the Diagonal Triangle Tank (P90) by Iris Schreier of Artyarns ( http://www.artyarns.com/ ), who gave a workshop at the yarn shop I work at ( http://www.sticksandstringsknitting.com/ ) last weekend. I thought it might be fun to make her pattern and wear it to the workshop in case someone needed help with the class, and I had some silk yarn on hand in my stash from last summer's expedition to Webs. I used a size 6 needle, and, true to my propensity to modify all the patterns I encounter, I decided to knit this one "in the round". It was a challenge to interpret the instructions to knit as one piece, but I really enjoyed the construction of it, and of course, it is always useful to try on stuff as you go. I had to add a bit to the front to make it fit without being too revealing, and I kept the V in the back instead of squaring it off. I was going to add sleeves, but ended up finishing it as a sleeveless tank, so I could wear it as a vest. I used about 650 yards of yarn, and I have a bunch left over, so it might appear as a scarf in future!

Here is my friend Dot modeling it for me:

Saturday, May 17, 2008

Leafy Lace Tunic

Here is what happened to the leaf lace vest I started a while back. I began from the top, using Cotton Classic, size 9 needles, and Leaf lace, and joined in the center to get a pullover. When I got to the waist, I ran out of yarn, but I wanted a longer sweater, so I rummaged around in the stash, and found one skein of a similar color, and two skeins of the darker teal, so I figured that if I changed the lace pattern when I changed yarn colors, it might turn out to be interesting. I used hexagon mesh, then transitioned to an arrowhead pattern, then transitioned to a lace edging #49 from Lavori Artistici a Calza 11. Then I single crocheted two rows around the armholes and a row of SC2, chain3, to make a picot edging , which also finished off the hem. Below is a snapshot of my neice Allie modeling it. I thought it needed something, so I knit an I-cord and added that. Lots of fun to wear, and fun to knit! I have yet to block it, though, as I'm waiting for it to stop raining.

Wednesday, April 09, 2008

Summer Fling

I finished my top down raglan cabled sweater. It turned out a little bigger than I wanted, so I might have to give this to some unsuspecting friend, but I love the yarn. Rowan Silk Tweed, 8 skeins, size 8 and 6 ( for ribbing) needles. You don't need a cable needle for this yarn, as it stays right where you put it! Lots of fun to make, warm and cozy and not heavy as cotton might be. A great inbetween season sweater, but I miscalculated on the design so it is a bit bigger than I'd like. Oh well, next one will be perfect!


Filling in Triangles

Moving right along, I picked up along the angles and finished the sleeves, doing a double decrease on every right side row, and on the purl side every 4 rows to taper the sleeves, and SSK or K2tog on the edges to finish off the edge of the sleeves. The sides were worked similarly, but when I got to 30 sts on each side of the side triangles, I inserted a mitered square, and then finished off the triangles sideways for more interest. Now I want to add a bottom and center front garter edging and build up the neckline a little bit. It is coming along, although slowly because in the meantime I got inspired to knit something else!


Friday, March 21, 2008

Sleeve Details

I have used a three-needle bindoff to knit the gusset stitches together, picked up and added a row of mitered squares along the diagonal of the arm, and then picked up along the diagonals to knit the final rows of the last triangle to finish off the arm. As I want a taper to the lower arm, I will be knitting 3 rows knit, one row purl, and on every right side row make a slip2-knit one-psso at the underarm "seam". I will also make a double decrease on the knit wrong side row by moving yarn to the front, slip 2 sts purlwise through the back loops, purl one, slip 2 stitches over. This should provide a taper to the arm, and keep the bias knitting continuing as needed. As my arms conveniently are short, I won't be making small mitered squares here, but simply continue to end of the triangle. On the cuff edges, on every right side row, I knit1, SSK, knit to center underarm, S2K1PSSo, knit to last 3 sts, K2tog, slip1.
On wrong side rows, it is: K1, purl to last stitch, slip with yarn in front, alternating with a knit row which has the double decrease purlwise in the center, and slip the last stitch of the row with yarn in front. This will bind off on the diagonal at the cuff on right side rows only, and provide a slipped stitch edge at the cuff. I probably will do a garter edge for the final cuff, but I'll decide that later.. I'm enjoying how the striping is coming out on this, kind of asymmetrical but not too much. This colorway, 166, has some bright green and some pukey pinky greys, which I've used very sparingly. Luckily, this yarn is easily spit spliced, so I have been editing the colors! Lots of fun.

Wednesday, March 19, 2008

Pineapples

About 6 years ago,we cut off the tops of some pineapples, placed the tops in a pot with soil, and some time later, the plants rooted, and started growing. I have a small greenhouse room, and put these plants ( I now have 5 of them) in the sunny window....3 years later, two of the plants sent up some buds, and produced fruit! The pineapples were only 4 inches tall, but they were delicious. A few weeks ago, one of the plants decided to fruit again, so here is the developing pineapple! It is so cute! There are little purple flowers around the bottom, and the typical shape. It is such fun to watch this grow...

Divide and Conquer

As it is raining today, I apologize for the color of these photos (the incandescent lighting gives a yellow cast), but here is the current state of sweater progress. I have divided for sleeves, after reaching my target number of stitches, by folding the square in half along the shoulder lines, then marking every 14 sts and picking up at the underarms to make a mitered square from the 4th group of stitches from the corner. In my enthusiasm to knit this, I forgot to take photos of that process. Oops. In the upper right, you can see a folded square hanging off which becomes the bottom of the sleeve. In this design, I discovered that I could make a little underarm gusset by joining ( in a 3 needle bindoff) a group of sts on the diagonal section between the body and the arm. I think this will give a better fit and slimmer arms.
Here is a photo of the back:
I was clever here to get the colors to line up symmetrically on this row of mitered squares, but I'm sort of going for a random look, so on the front I'm letting the colors fall where they want.
Here you can see how the fronts relate to the back row of squares. I started at the underarms, and worked downward from there, as I wanted the center lines of the squares to be vertical. In this sequence, I can pick up along the sides of one square, and use the live sts from the straight portion, one group of 14 sts at a time. The only sewing is at the center back corner., where I must join the edge of a square to the corner. Sewing it gives a neater join than picking up and K2tog at end of rows, I think.

Thursday, March 13, 2008

Olympic Sweater 2 part 2

So, now I've been knitting away on the straight portion below the first row of mitered squares. It is a lot of knitting; I'll need 30 rows to make up for the row. I could have added another row of mitered squarees instead, but I thought this would be easier. However, every other row is longer by 8 stitches ( 2 at each corner) so it is getting really long! My target is 112 sts in each section , so that is 448 sts. Lots of knitting! Here I've marked off roughly where the points to add next row of mitered squares will be, but those will be added after I divide for sleeves. Stay tuned for this!
My dear friend Melody Johnson ( http://www.fibermania.blogspot.com/ ) spent the day yesterday knitting a teensy version of my basic top down diagonal pattern, and posted it on her blog! It is so cute! Here I'm adding squares, but it is the same basic idea. If you would like a copy of the basic pattern, email me. It is a long pdf, and I'm charging $8 for it.
Off to work I go...more tonight...